});

Friday, April 1, 2016

How to Charge Your Phone With a 9V Battery

I feel stupid for not even knowing or seeing this life hack until now. I have many of these batteries just laying around. I haven’t needed a 9v battery in years.
This works well (I just tried it) my new iPhone 6 plus went from 2% to 11% in 16 mins. Not to shabby, huh? I wouldn’t go around charging your phone using this method on a daily basis but in an emergency or a no other choice situation this is a great alternative way to charge your cell phone.
Simply place the end of the car charger into the positive (+) end of the battery, and use a key to bridge the gap between the metal piece on the side and the negative (-) end of the battery. You can hold it in place, or use the tape to hold it all together if you wish.
Plug your cell phone, camera, or whatever else you would want to charge into the car charger, and voila — power.
Check out the video from the crazy Russian hacker below:

Source

Solar Chargers:

Survival Skills: How To Get Water And Syrup From Trees


Throughout much of North America, tree sugaring time is near or already underway. Depending on the weather and your latitude, you will have trees with running sap between January and early March. Some of these trees can be sources of water if you get caught without anything to drink. Other trees can provide live-saving calories at one of the roughest times of the year for survival.
The ubiquitous and familiar maples (the genus Acer) have a watery sap that is used for water and to make maple syrup. The sap flows in late winter and early spring when night time temperatures are below freezing and the days are above freezing. The sap is slightly sweet and can be tapped by boring a hole in any maple tree (except the introduced Norway maple , Acer platanoides, which has milky sap). Drill the hole through the bark, about an inch and a half into the sapwood, angling the hole upward. Any reasonable sized drill bit can work, but many folks go with a 7/16-inch hole, which matches commercial sized metal tubes. Insert a tube (a.k.a. spile) and allow the sap to drip into a container. In the photo, I am using a naturally hollow Knotweed stalk. Use what you have. Bamboo, PVC pipe, and copper tubing all work. If you have trouble finding anything in the shed that will work as a spile, check out the Lehman’s company.
They sell sugaring equipment and a host of non-electric household and farm goods.
The sap flows best on the south side of the tree, which has the most sun exposure. You can insert one tap for each foot of the tree’s diameter. If you’re using the sap for drinking water, know that it doesn’t keep long before souring, so use it soon. If you’re looking for something sweeter, boil the sap in an open pot until you have a viscous syrup, which should keep for months. Maple syrup has about 100 calories per ounce.
Sap from sugar maple trees has the highest sugar percentage; other maples and different tree species only have about half as much sugar. Sycamore trees (Platanus occidentalis), birches (the genus Betula), and hickories (the genus Carya) can also be tapped for drinking water that can be boiled for syrup. Black birch sap is particularly delicious. Walnuts (the genus Juglans) can be tapped for drinking water, too; however walnut is not particularly tasty like maple, and you’ll want to skip that one for syrup production.
Do you harvest syrup from local trees? Tell us about your winter sugaring process in the comments.

Source:
http://www.outdoorlife.com/blogs/survivalist/2013/02/survival-skills-how-get-water-and-syrup-trees

Books Of Interest:
 

Thursday, March 31, 2016

Survival Skills You’ll Need If Society Collapses

Many survivalists and preppers have planned to live sustainably on their off-the-grid homestead. They have easy access to clean water, a pantry full of stored foods, a flourishing garden, some chickens or rabbits for protein, and a security plan to protect themselves.
However, if society ends as we know it, even the best homesteaders will find that they need something. For example, maybe a disease runs rampant through the rabbit hutch and you lose them all. Or maybe the homestead was attacked and your spare weapons cache was raided. Whatever it is that you lack, you need to have something of value to trade with someone who has what you need. This is called barter, and in a grid-down or post-apocalyptic society, there will be no cash or credit — hard goods or services will be necessary to procure something critical to the homestead.
There are two ways to be ready for when it comes time to barter. The first way is to build a stockpile of common things that others will want. Examples include quality knives, can openers, sewing kits, pain medication, shoes, hats and gloves. The second way, and really the only long-term solution, is to learn a new skill that either generates goods for barter, or provides you with a skill set to provide needed services to others.
For this latter approach to be successful, five requirements must be met:
  1. Your skill or the goods created must be something people want. For example, making candles would be far more valuable than fancy embroidery.
  2. Many people must have demand for the skill or goods. There’s generally little benefit to making something that very few people need. Instead, you should have what everybody needs. For instance, in the cold north, everyone needs gloves.
  3. You must be able to practice the skill, or generate the goods, using resources only available from your homestead. It does no good to learn how to make soap using lye that you buy online, if you don’t have alternate way of making lye on the homestead. A minor exception to this rule is if a needed supply will be available locally through barter. An example of this is if you specialize in making leather gloves and shoes, and your neighbor has a tannery.
  4. All operations must be done without power. The availability of power after a disaster is not guaranteed, even if you have an alternative power source.
  5. Practice, practice, practice. After society ends as we know it, there will be a lot of hard work and frustrations. By practicing the skill, you can iron out any difficult areas and learn how to perform it efficiently and reliably.
Read more from the source

Books Of Interest:

The 5 Most Important Crops You Need For Survival

Americans garden for many reasons. For some, it’s pleasant to get some fresh air after a long day in the office. Others do it for aesthetic pleasure. However, for those striving for self-reliance on their off-the-grid homestead, gardening is an essential component in the family’s food production operation. In many cases, both time and space limit the size of a garden.
To address those seeking to grow a large portion of their own food on limited resources, author and organic plant breeder Carol Deppe has written an informative book, The Resilient Gardener: Food Production and Self-Reliance in Uncertain Times.
Deppe’s book covers food storage and how to barter with other like-minded people to supplement your food supply. Nevertheless, Deppe’s advice on growing five important crops is of particular use. Her selections are based on calories, nutrients, storage and resiliency during the variable and unpredictable weather patterns. Her selections also are such that they may be grown in many regions of the United States’ diverse climates. Finally, all of her choices rely on using heirloom varieties, so that seed-saving helps in self-reliance. Read more from the source

Books Of Interest:

Native American Herbal Remedies

By
Food Blogger and Published Author
Native American herbal remedies have been used for centuries to cure common illnesses and treat various health conditions. Without access to doctors or hospitals, Native Americans relied on the many plants that grew around their homes. Much of this knowledge has been forgotten; however there are those who are trying to document the remaining recipes.


Common Native American Remedies

Although many Native American herbal remedies are still being used today, there are some that many health care providers warn could be dangerous. Always research the individual remedy and talk to your health care provider before using any herbal remedy.

Respiratory Problems

Native Americans were as prone to respiratory problems as anyone else. Asthma, coughs, and colds were treated promptly with teas made from natural ingredients or combinations of these ingredients.
  • Asthma was treated with skunk cabbage to loosen and remove phlegm.
  • Pleurisy root was used for bronchitis, pneumonia and other ailments of the lung. It is still an excellent remedy for these illnesses.
  • Wormwood was also used for the various symptoms of bronchitis.
  • Sage was used for the discomfort of colds and flu.
  • For coughs the various tribes used the following:
    • Boneset was used to treat coughs and colds by many different tribes.
    • Aspen tea was made from the inner bark of the Aspen tree.
    • Wild Cherry tea, made from the bark of the Wild Cherry Tree, was made into a tea.
    • White Pine, in which the inner bark was brewed into a strong tea.
    • Sarsaparilla was combined with sweet flag as a cough syrup.
    • Rabbit tobacco
    • Bloodroot

Back Pain

  • Arnica used as a rub or a poultice.
  • Horsemint tea was drunk to help with back pains.

Diarrhea and Other Stomach Ailments

Diarrhea could quickly cause dehydration in the harsh conditions that many tribes lived in. These Native American herbal remedies were used when stomach problems occurred. These remedies were used in tea form unless noted otherwise.
  • Diarrhea
    • Black cherry root
    • Black cherry fruit was often fermented naturally for up to a year, and then the juice was used to cure dysentery.
    • Dogwood bark tea used as enemas.
    • Black Raspberry root
  • Other Digestive Disorders
    • Dandelion roots were used for both urinary tract problems and heartburn.
    • Yellow Root was used for stomach aches.
    • Sage for upset stomach
    • Juniper for urinary tract infections as well as diarrhea.
    • Elder was used as a laxative.
Various Other Remedies
  • Wild Yam root
    • Menstrual cramps
    • Ease childbirth
    • Hormonal imbalances
    • Libido
  • Sage
    • Irregular menstruation
    • Childbirth
    • Bleeding
  • Purple Coneflower, also known as Echinacea.Source
  • Passion Flower
  • Willow
    • Pain
    • Fever
    • Headache
  • Purple Coneflower
    • Snakebite
    • Insect bites
    • Toothaches
  • Black Cohosh
    • Female hormones
    • Arthritis
    • Cough
    • Headaches
    • Tinnitus
    • Sciatica
  • Skullcap
    • Restless leg
    • Insomnia
    • Nervous tension

Authentic Native American Herbal Remedies

Many Native Americans still grow, gather, and produce the herbal remedies that their ancestors used to treat a multitude of illnesses. If you wish to support the Native American community or are partial to the idea of these traditional herbal remedies, here is a partial list of websites.

Many of the common natural medicines that you find in your local health food store are, or once were, Native American remedies. Many of those herbs that the Native Americans used were given to early settlers for their own maladies. These herbs have been used for generations, and many were in common medical use before conventional medications were developed.
Native Americans did not have some of the options for capsules and tinctures that we have. More than likely most of their herbal remedies would have been made into teas. In many cases modern forms of these herbs serve the same purpose and work as well as the tea.

Source:
http://herbs.lovetoknow.com/Native_American_Herbal_Remedies

 Books Of Interest:
 

Survival Skills: How To Build A Stone Oven


After our chicory root coffee post the other week, someone asked us how we should roast our roots for coffee while out in the field. Well, that sounded like a good enough invitation for me to roll out one of my favorite wilderness kitchen projects: the stone oven.
The stone oven is a good cooking tool for meats, vegetables and even some breads. Once built, it can be used over and over again. With the work involved, this wouldn’t make much sense for a nomad, but it can be a useful addition to a permanent or semi-permanent base camp. And what a great way to cook a roast!
There are really two types of stone ovens: those that are either internally or externally fired.
For this installment, we’ll focus on the internally-fired oven, which is usually made of very large stones that can absorb a lot of heat, hold the heat, and radiate it back for some time. This oven type is heated by simply building up the fire inside the oven for at least an hour and a half (two hours is better). Just about any tight pile of suitable rocks with a hole in the middle and a door will work as an oven, but it’s always nicer to bring out your inner stone cutter to craft a decent looking oven.
To make a typical square oven, three walls are built out of stone and the gaps are filled with clay or mud. One or several large, wide rocks are placed on top to form the roof of the oven, and all gaps are caulked with clay. Think about the oven door as you build the walls and roof, looking for a stone that will fit well in the oven opening. Internally fired ovens should have an opening on the top at the back of the oven to act as a chimney during firing. Once built, the oven can be fired right away. Build the fire inside with the door in place, but cocked to the side. This ajar door allows the fire inside the oven to breathe, but it allows the door to heat up too.
Additional Tips:
Internally-fired ovens should be fired for 1½ to 2 hours, after which the ash and coals are swept out, the food is quickly placed inside, and the door and chimney are sealed as tightly as possible.
Use only stones from a dry area, as wet or waterlogged stones can explode dangerously when heated. Granite, soapstone and greenstone are the best and safest choices for these ovens.
Ever use a stone oven? Let us know what you prepared with it.
Source

Books Of Interest:

Tuesday, March 29, 2016

How To Make A Serious Survival Bow From PVC Pipe

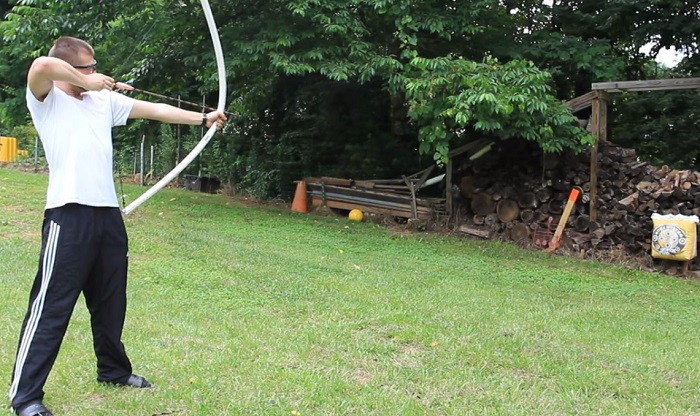
The bow is an amazing weapon. Of all the weapons which have been handed down through the centuries, the bow is one of the few ancient weapons that are still in use today. While we don’t see armies taking to the field armed with bows these days, there might be times when using a bow would make more sense than using a rifle. If you want to hunt silently, the bow is the way to go.
In the case of a major disaster with no access to ammunition, it would be natural to revert to the bow for hunting and defense. While shooting a bow accurately requires more practice than shooting a gun, and the range is more limited, it is still a formidable weapon. We should all know how to use a bow as part of our survival training.
Bows were traditionally made of wood, and you can still find some that are made of wood today. In a survival situation, you may want to make a bow out of wood. However, there is a modern material that is excellent for bow making.  PVC pipe is not as attractive as wood, but it can be highly effective.
How To Make A Survival Bow From PVC Pipe
PVC pipe is inexpensive, readily available and easy to use. It also contains potential energy when bent, making it an excellent bow making material. You can mold it using nothing more than your hands and a heat source. On the off chance that you make a mistake forming it, it’s really not a problem. All you have to do is reheat it and form it again. Once cooled, it will hold the new shape, while maintaining its combination of flexibility and rigidity.
PVC Survival Bow Design
PVC bow designs fall into three different categories:
  • Longbow. The longbow is the simplest of all designs. It consists of a straight piece of pipe, which has been drilled at both ends for it to be strung. When the bow is strung, the pipe is bent to form an ark.
  • Recurve bow. The recurve bow is probably the best combination for PVC. The curved arms and reverse curved tips greatly increase the potential energy stored in the bow, while making it more compact and easier to use.
  • Compound bow. Modern hunting bows are compound bows with a pulley attached to each end of the arms. This design allows much more force to be stored in the bow, while making drawing and holding the bow easier.
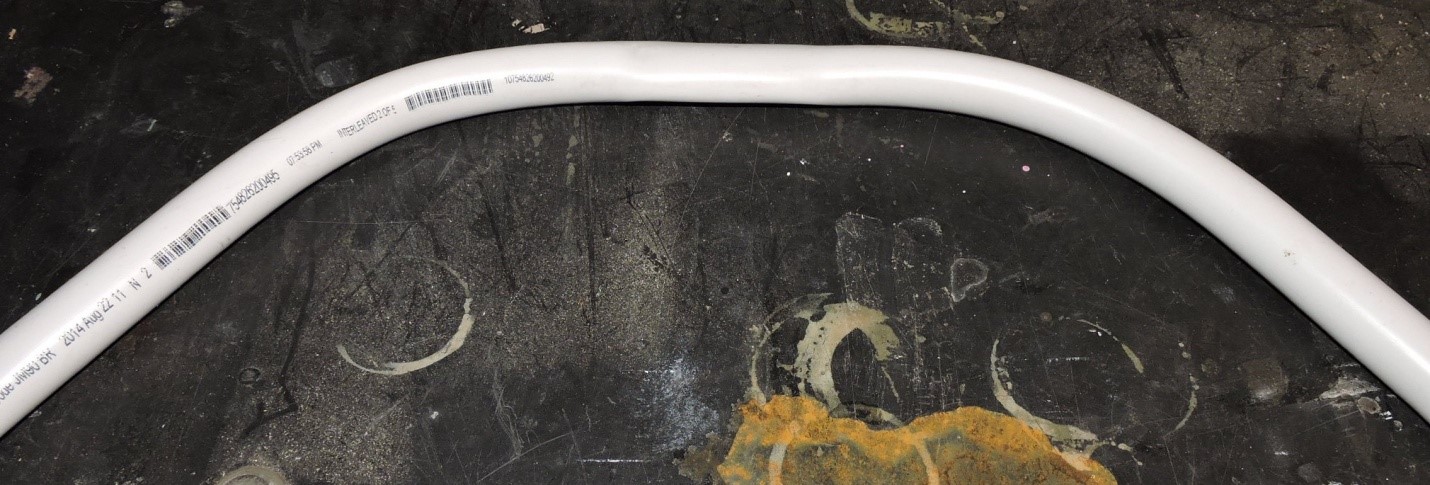
Theoretically, PVC bows can be made out of any size PVC pipe. but reality poses some limitations on us. While I have seen a few longbows made out of one inch diameter pipe, most are made of 3/4 inch, schedule 40 pipe. This pipe provides a nice balance between rigidity and flexibility. Don’t use thin-wall PVC, as it isn’t strong enough to provide any true energy when released. It is also much more likely to kink when the bow is drawn.
Making the PVC Recurve Bow
The basic difference between the recurve bow and a simple bow made out of straight PVC pipe is that the recurve bow is curved to increase the amount of velocity it can transfer to the arrow. This curve is made by heating the PVC with a heat gun, bending it to the desired shape and holding it there while it cools. No special tools or jigs are needed, with the exception of the heat gun and one large can.
New Mini Pocket Power Plus Can Charge All Your Electronics — And Jump Start Your Car!
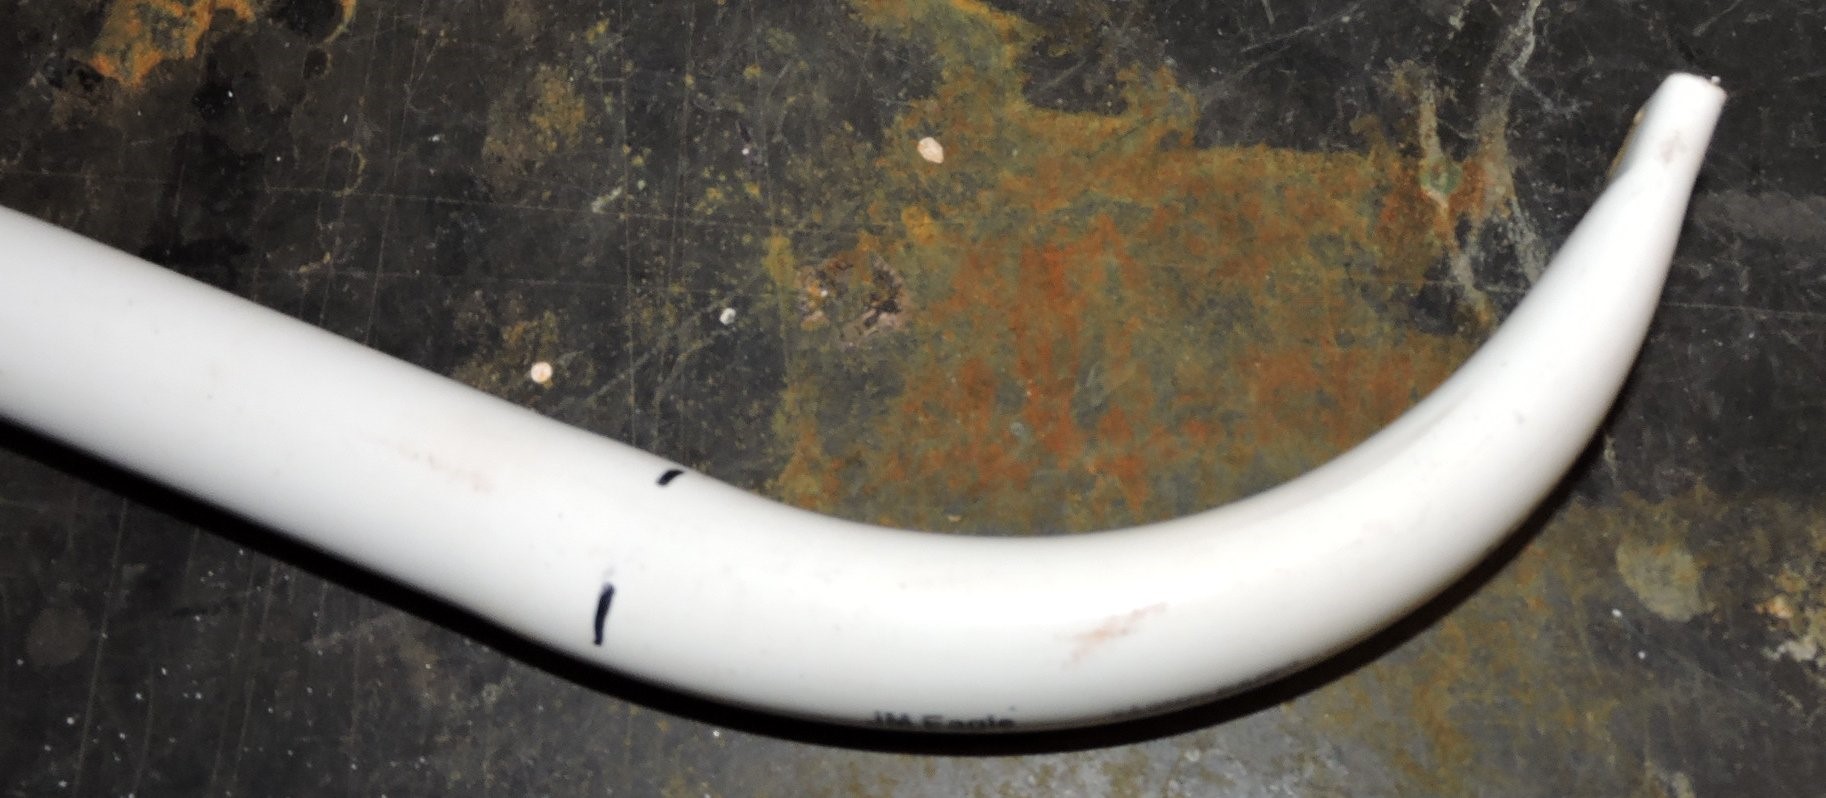
I used a four-foot  piece of 3/4 inch, schedule 40 PVC pipe for my bow. You can use a longer piece if you like (up to six feet long), but I wanted a compact bow. Mark the center four inches of the bow, as that will be your handle. Also mark eight inches from each end, as those will be the curved tips.
How To Make A Survival Bow From PVC Pipe
The first bend is to make the main curve of the bow arms. You will be heating and bending one arm at a time. Heat the section from the edge of the handle to the mark for the curved tip, stopping a little short of the curved tip. Rotate the PVC as you are heating it, so that it heats evenly all the way around.
Please note that if you are heating the PVC with a back and forth movement of the heat gun, you will end up heating the ends of the stroke more than the middle. Make a portion of your strokes shorter (about 1/4 of them), covering just the center of the area, to ensure even heating.
Once the PVC has softened, bend it to form a curve. This curve should make the end of the arm point about 45 degrees from the original direction. Perform the bending on a flat surface, such as a workbench top, to ensure that you keep the entire bow on the same plane and to avoid a corkscrew shape. Hold until it cools, and then repeat for the other side.
It can help to mark the actual curve you end up with from the first bend on a piece of cardboard, so that you can use that location as a template for the other side. That way, you can ensure that both arms are bent evenly.
How To Make A Survival Bow From PVC Pipe
With the primary bend in the two arms, it is time to reduce the amount of depth of the bow by recurving it at the handle. This will be a short bend, only heating the four inches of pipe that is directly adjacent to the handle. Push the curve back in the other direction, making a bump in the overall geometry of the bow.
Please note that we haven’t changed the original curve of the arms by doing this; we have just changed the beginning of the curve. Since the rest of the curve hasn’t been heated, it shouldn’t change.
The next step is to recurve the ends. In the process, they will become somewhat flattened. Many people do this by flattening them first and then curving them. I find it easier to just curve them, allowing the flattening actions to come about as a natural part of curving the piece. This also makes the transition from round to flat gradual, eliminating stress points.
How To Make A Survival Bow From PVC Pipe
To recurve the ends, you’ll need a coffee can or other large can and a vice. I used a woodworking vice in the picture, but you can use any large vice you have available. If you don’t have a vice available, you can hold it by hand as long as you are wearing insulated gloves.
Heat the end eight inches of the arm. Clamp the last 3/4 inch of it in the vice, with the coffee can and bend the pipe around the can. You want about a 90 degree angle between the tip of the arm and the end of that recurve. Since the idea here is to recurve the bow, the direction of the curve should be the opposite of the main curve of the arm. The flat at the end should be crosswise to the plane of the bow, so that when you are holding it, you see the flat and not the edge of the flat.
You need to be very careful at this point, as it is easy to make this bend in such a way that the tip goes off to one side, rather than being on line with the bow. If that mistake happens, the problem can be rectified by reheating the pipe just at the beginning of the tip recurve and adjusting it to align with the rest of the bow.
Allow the pipe to cool and then remove it from the vice. Repeat for the other end. If the very end of the pipe is not totally flattened or if it still has an opening after recurving the tips, you may want to reheat just the very tips and flatten them again.
How To Make A Survival Bow From PVC Pipe
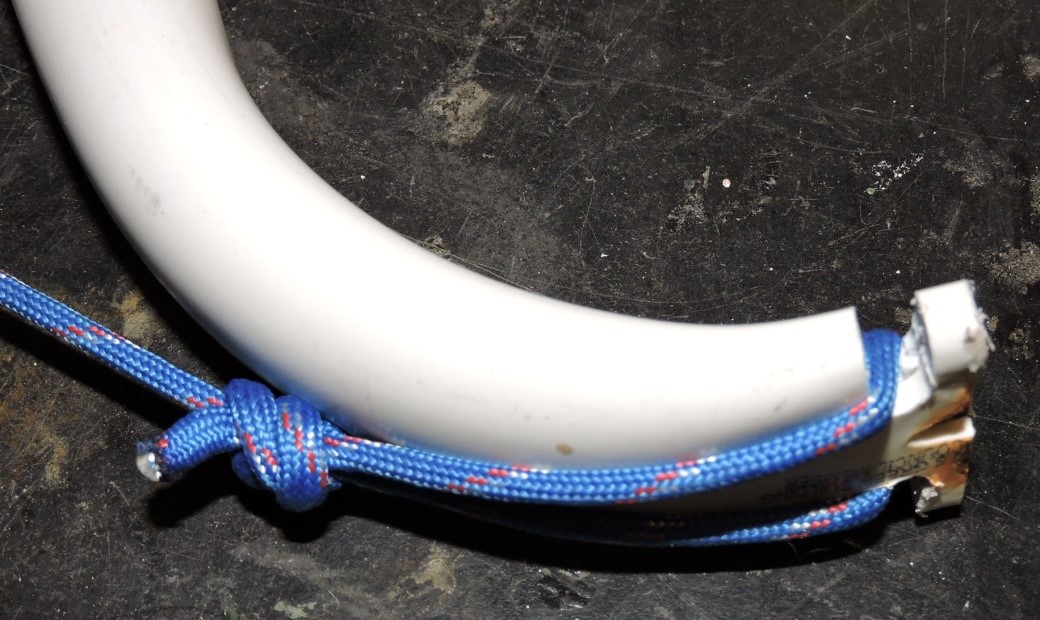
The ends of the bow arms need to be notched to hold the cord. This can be done by drilling 1/4 inch holes through the flat of the ends. Then, cut the material out between the hole you just drilled and the edge of the flat on the pipe.
You can paint the finished PVC pipe bow as desired to make it harder to see when you are stalking game through the woods.
How To Make A Survival Bow From PVC Pipe
The last step is to put a string on your bow. If I was planning on using this bow regularly, I would have a real bowstring made for it. But since this is a survival bow, I’m going to use something that I would normally have on hand in a survival situation —   paracord. Tying a loop on each end of the paracord allows it to be attached to the ends of the arms, where it can be held in place by the loops. The cord should be a little shorter than the natural span of the bow, so that you have to bend it slightly to string it.
You will notice in this picture that the PVC at the tip of the arm is somewhat brown. This is what happens if you overheat the PVC while working it. That happened while I was reheating the PVC to flatten the ends.
By following these steps, you will have created an inexpensive and durable bow. Now you know that you can build an effective survival weapon with materials you already have on hand in your home.
Have you ever made a PVC bow? What tips would you add? Share them in the section below:

Source:
http://www.offthegridnews.com/extreme-survival/how-to-make-a-serious-survival-bow-from-pvc-pipe/

Survival Skills: Smoking Meat and Fish for Flavor and Preservation


Smoking meat and fish can produce some remarkably flavorful results, and it can be done without much in the way of modern conveniences. Smoking can also be used in conjunction with drying to save and preserve your meats and fish, all without the need for electricity or special equipment.
There are two traditional ways to smoke fish and other foods: hot smoking and cold smoking. Either can be performed with the same meats and the same apparatus, the only difference being the amount of heat used.
Hot Smoking
This technique involves a closed box to hold in the smoke and the heat from your smoke-producing materials. The foods are cooked by this heat, and permeated with a smoky flavor. Fish prepared in this manner can last up to a week at room temperature. Red meats, white meats, or any poultry should be eaten the same day, or the next day at the latest.
Cold Smoking
Cold smoking is done at cooler temperatures, for a longer period time. The goal in this method is long-term storage, which requires more of a drying process than a cooking process. It should not get hot enough in the smoker to actually cook the meat or fish. Temperatures under 100 degrees Fahrenheit are a must; under 80 is ideal. As with hot smoking, cold smoking can be done in a box or shed. It can also be done in open air by placing the meat or fish downwind of a smoky pile of coals. Maintain the smoking and air drying for a full day. If the meat becomes almost brittle, it is done. If conditions are humid and/or still, bring it in at night and smoke it a second day.
Smoking with Wood Chips
The heat source is important in smoking, but the woods chips are the most vital part of the operation. Modern smoking setups typically involve a pan of dampened chips sitting on a hot plate (portable electric burner). More traditional methods (i.e. without electricity) were achieved with a pan of hardwood coals from a fire and wet wood chips sprinkled over the top of them.
There are a number trees whose wood imparts a nice flavor to meat. Find out which of these are locally abundant in your area and chop up some chips with an axe or machete.
- Apple wood from a local orchard makes a great, sweet smoke perfect for poultry and pork.
- Hickory gives a rich, sharp flavor and makes for hot, long-burning coals.
- Maple wood chips are excellent for smoking cheeses.
- Mesquite, native to the southern US, is a coveted smoke producer with an earthy flavor.
- Ash makes a lightly flavored smoke that is great for fish and poultry.
- Oak wood smoke has a heavy flavor. Red oak is good on ribs and pork, while white oak turns into more long-lasting coals.
Just make sure to avoid any toxic trees. My local bad guys in the eastern U.S. are black locust, yew, buckeye, horsechestnut, rhododendron, and mountain laurel. You’ll also want to skip bitter smoking and resinous woods like cedar, cypress, redwood, fir, pine, spruce, and other needle-bearing trees.   
Do you smoke your game meat and fish? Which method do you prefer? Do you have a favorite wood? Let us hear about it in the comments.

Source:
http://www.outdoorlife.com/blogs/survivalist/2014/07/survival-skills-smoking-meat-and-fish-flavor-and-preservation?eJu8bMk97vKVvfcH.32

Books Of Interest:

Choosing Your Survival Shelter Location

survival shelter


There you are, lost in the wilderness. You zigged when you should have zagged and have finally come to terms with the thought that you’re going to have to spend the night in the rough. With only an hour or so of daylight left, it is past time to choose your survival shelter location and get going on building it. Thankfully, you have a few supplies with you, such as a knife, an emergency blanket, and some paracord. You’ve also taken the time to study a bit about wilderness survival so cobbling together a small debris hut or lean to shouldn’t be too difficult or time-consuming.
Before you begin construction, though, you should take the time to find a truly suitable location for the shelter. Doing so will help to avoid adding to your list of woes. Keep in mind, too, that all of these suggestions apply whether you’re in an actual survival situation or if you’re just out camping for the night. More than one casual hiker or Scout troop has been caught unawares and had a bad campsite turn a fun outing into a bad experience, or worse. Not to be dramatic, but your survival shelter location could determine if you survive or not.

Building materials.

First, if you are building some or all of the shelter from natural materials, such as a debris hut, you will probably want to locate your shelter near said supplies. It makes little sense to carry branches, logs, and such great distances if you don’t have to do so. Hopefully you’ll only be staying in the shelter a single night but, just in case, if you find a water source in the area, position your shelter near it, but not directly on it. We’re talking about conservation of energy, here. The less energy you expend having to harvest water, the more energy you’ll have for other necessary tasks.
You may also choose to use a natural cave or boulder to shelter, or  gather rocks together to form a wind break for your shelter. Gathering rocks has the secondary purpose of leaving a more comfortable area for you to lay down and sleep, as does gathering sticks for a debris hut or fire. The area under large trees is often sheltered from rain and snow, making it worth at least looking around under any large trees. Be careful of roots both in terms of where you are sleeping and where you build a fire. The last thing you want to do is accidentally set an entire tree on fire because the roots were in your fire pit!
You may also choose to gather materials such as dried grass, fir branches, or other softer materials to put down inside your shelter as a softer, warmer place to sleep. Bare ground is generally cooler than people, especially at night. The cooler temperatures can make sleeping uncomfortable, so putting an insulating layer (such as those listed above) can do a lot for your health and comfort.

Shelter location.

Next, take a moment to look above your chosen location. If you see any large dead branches, find a different spot. Those branches are called “widow makers.” You probably won’t want to be underneath one should it break loose and come crashing down. Sheltering under a large tree may give you a bit of added protection from the weather. There is a reason there is often a dry spot under large trees after even a heavy rain or snow fall.
Take a look around and see if there is evidence of large amounts of rain runoff. While the sky might be clear now, who knows what the night might hold. If you’re in a gulley or ditch, it might turn into a fast moving stream after a sudden downpour. If there is a log, line of rocks, or other natural structure, it could funnel water in a particular direction and you won’t want to put your shelter at that spot, but one side of it could also be less windy – and therefore warmer.
There is an awful lot of wildlife that is nocturnal, meaning the critters are most active after sundown. If your shelter is smack dab in the middle of the forest’s version of an interstate highway, you’re going to have a lot of visitors. Some of them might not be very happy that you are blocking traffic. While in a true survival situation we might be looking forward to bagging one or two Happy Meals on legs, you probably don’t want them crawling into bed with you or bumping into your shelter all night long. Remember to keep an eye out for buys when you choose your location.
If there is a patch of poison ivy, oak, etc. in the area, put your shelter in a place where you won’t be likely to walk straight into the poison. This is more of an issue for middle of the night bathroom pit-stops because you won’t be able to see anything and you want to minimize the chances you will walk through it, or use it for toilet paper.

Shelter orientation.

You should also plan out the orientation of your shelter. The sun may shine straight into it and wake you up. Do you want that? (The answer may be yes, or you may need to sleep longer.)
You don’t want the prevailing wind coming directly into the mouth or opening of the shelter, unless you know the night will be hot and the breeze welcome. This is doubly important if you’re building your fire near the opening of the shelter! The last thing you want is to have smoke and burning embers blowing in your face. If warmth is a concern, and it almost always is, build a reflecting wall of logs near the shelter opening, then make your fire between that wall and your shelter. You can use your Mylar blanket, if you have one, to reflect more heat toward you.
By giving just a little thought ahead of time, you can dramatically improve your situation and avoid further risks of injury.
Jim Cobb contributed to this article.

survival shelter FB size

There may be links in the post above that are “affiliate links.” This means if you click on the link and purchase the item, I will receive an affiliate commission, which does not affect the price you pay for the product. Regardless, I only recommend products or services I use personally and believe will add value to my readers. 

Source:
http://thesurvivalmom.com/choosing-survival-shelter-location/

Books Of Interest:


Monday, March 28, 2016

How to start a fire in the rain

By Cliff Jacobson


How to start a fire in the woods, even when it’s wet.

Campfire

On a bone-dry day or when there’s plenty of dry paper or fire-starter, anyone can make a fire. If the weather deteriorates to a persistent rain, they might get smoke. But that’s no guarantee they’ll get fire. Here’s how you can make a fire when the woods are wet with rain.
This method isn’t fast, but it works with any kind of wood — even damp wood. You’ll need a:
  • Sharp knife. To split fine kindling, set the sharpened edge of the knife on the end of an upright piece of wood then pound the spine through with a thick stick. Use a folding knife with a secure lock so the blade won’t close on your hand when you pound on the spine.
  • Folding saw.
  • Small hatchet to use as a splitting wedge, never as a chopper.
First, collect your wood. Locate a dead, downed tree, out-of-sight of tents, trails and waterways. Saw off an arm-thick limb. Touch the sawed end of the limb to your cheek (the center should feel dry). Don’t worry if there’s a ring of wet wood near the bark; you’ll discard it when you split the piece. Reject the wood if it smells damp or punky. The wood is good if it passes both cheek and smell tests.
Saw the limb into footlong sections and split each section into kindling. The hatchet should be used as a splitting wedge so there’s no chance of an accident.
Splitting wood is easier (and safer) with two people. Hold the hatchet with both hands and have a friend knock it through.
Hold the hatchet firmly with both hands and allow a friend with a log chunk to pound the hatchet head through.
Use that same procedure (with a lighter log) to split fine kindling with your knife. Then, use your knife to prepare your tinder. Cut a handful of wafer-thin shavings from your dry splittings.
Now that you’ve reached the dry part of the wood splittings, slice off several wafer-thin shavings to use as tinder.
Assemble the tinder (a handful of dry wood shavings no thicker than a match), kindling (one-eighth to one-quarter-inch thick dry wood splittings) and fuel (quarter-split logs). Trim all bark and damp wood from your tinder and kindling, and separate your wood into piles — tinder, kindling and fuel.
If it’s raining, work under a tarp so that all the materials stay dry.
Starter Accessories
  • Carry a candle and chemical fire-starters.
  • Cotton balls dipped in Vaseline, a flattened wax milk carton and cigar-size newspaper logs that have been dipped into melted paraffin make good fire-starters. Don’t use loose newspaper pages; they absorb moisture on damp days.
  • Make a “fire blower” as a bellows to nurse a developing flame by attaching a 6-inch piece of aluminum or copper tubing to a piece of rubber hose.
Once you have gathered the materials, build your fire from the ground up by following the four steps below.
Build It Right

  • Set two 1-inch-thick sticks about 6 inches apart on the ground (see the figure at right). Place four pencil-thin support sticks across the base. Space the support sticks about half an inch apart.

    1. Stack an inch-thick layer of wafer-thin shavings on top of the support sticks. Leave some space between each shaving to allow for airflow. Set two half-inch thick “bridge” sticks across each end of the base structure to support the heavier kindling you’ll add next.
    2. Place fine, split kindling across the support sticks. Splittings should be parallel to one another with plenty of space in between. They should not compress the tinder below.
    3. Apply your match directly underneath the tinder (shavings). When the first flame appears, hand feed shavings (not kindling) into the developing flame. Don’t add kindling until you have a reliable blaze. The raised firebase will produce a powerful draft that creates a bright, smoke-free flame.
    Cliff Jacobson is a Distinguished Eagle Scout and the author of more than a dozen popular outdoors books.

    Source:
    http://scoutingmagazine.org/2011/01/ground-rules-rainy-day-wisdom/

     
    #1 BEST Fire Starter - SurvivalSPARK Emergency Magnesium Fire Starter - Survival Fire Starter with Compass and Whistle

    SE FS374 All-Weather Emergency 2-IN-1 Fire Starter & Magnesium Fuel Bar (Everything you need to start a fire!)